The Blog

Hello 2019

It's been quite a while since I wrote here & I'm really sorry for that. Overall, 2018 was a bit of a slow year photography wise, especially from around August to November I didn't pick my camera up much at all. This was mainly due to health reasons {if you want to know more about that you can read my post, Photography & My Health} So let me fill you in on what I've been up for the past few months & share a few of the photographs I've managed to take:

After having visitors over the Summer, which included helping my lovely Sister in Law with the Sony Bridge Camera I gave her while having a good session of Garden photography, I spent September resting & recuperating. Then towards the end of that month, I ended up with Bilateral Tendonitis in both hands which meant I had to take a rather unexpected break from Photography, writing, most things actually. I was unable to pick my camera for a couple of months & boy did I miss it!

Focal Length 85mm / Aperture: f/4.8 / ISO: 400 / Shutter Speed: 1/351s

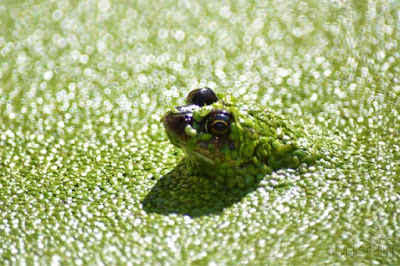
My hands finally started to feel better mid-November & I was able to have some time in the garden with my Macro 85mm lens. {My review of this lens} Then towards the end of November I managed to have a little outing to the Beach to photograph the Sunset. Since the Tendonitis, I have to be more aware of how I'm holding my camera, not stretching my right thumb too much around the back of the camera as it causes it to become painful & I have to stop.

Focal Length: 300mm / Aperture: f/5.6 / ISO: 400 / Shutter Speed: 1/2000s

December was an interesting month, after almost a year of having my website, I finally made a sale! Okay it was from a family member but it was so lovely none the less to have someone want to buy my work! I've renewed my website for another year. In fact, my site address has changed & I'm now the proud owner of www.loelizabethphotography.com I've also made a few changes & I'm trialing a dedicated *NEW* Gallery, so all the images I add are easy to find. After a month, I'll then filter them into the other Galleries. I use the "New In" feature on websites I browse & thought I'd try it out on my own. Please check out my site & let me know what you think.

Two Set of Four Coasters purchased from my Website. Coasters printed by Loxley Colour

I'm going to try to promote my site more this year & hopefully I'll have a few more sales from it. I'm also toying with the idea of starting a shop on Etsy & selling prints & keepsakes that way - but this is just an idea. I have to consider the impact this might have on my health, that is my priority. Selling through SmugMug is hassle free & I don't have to fulfil the orders personally, they come from Loxley Colour {UK Orders do anyway} If I sell on Etsy, I would be fulfilling orders myself; I'd still use Loxley Colour for the items I'd sell but I'd have a stock at home to then send out. So I have a few things to figure out & think about regarding this.

My last photography highlight came at the end of December when I was able to photograph a Wedding Venue. I went away for my Brother's Wedding & while I am not well enough to photograph a full Wedding {He didn't want me to be ill from photographing it} I did take my Camera Kit - Nikon D7200, 18-55mm, 35mm, 55-300mm lenses as I wanted to document my weekend away & I snuck down to the rooms the wedding ceremony & breakfast were being held in & photographed it. My lens of choice was my 35mm & it did a lovely job of picking up the details of the rooms from a distance & close up.

Focal Length: 35mm / Aperture: f/4.8 / ISO: 400 / Shutter Speed: 1/90s

I've finished post processing them & I've selected my favourites to share over on my Instagram in a week or two. So if you're not already, make sure you're following me on there so you can see them. I've not really got many photography plans for this year, other than to keep doing it & maybe be more creative & try some new techniques. I do know I'll be doing a Portrait shoot later in the year. Although my Brother had a photographer for his wedding, I'm going to be doing a more personal shoot for him & his wife in their wedding clothes along with their pets.

The other thing I have plans for this year is to try & write more posts on here. I really struggle to know what to write for this blog as I don't feel qualified to give photography advice as I'm not a professional. I have a few items I would like to write reviews on but other than that, I'm struggling to think of subjects, so if you have any suggestions on anything you'd like me to write about or how I took a certain picture, please leave me a comment or drop me an email. I'd really appreciate the suggestions.

I hope everyone's year has gotten off to a good start & that whatever your plans for this coming year are, that you can make them happen.

Happy Snapping!

Louise

Photography & My Health

I thought I'd get a little bit more personal in this post. I'm not sure whether I've actually mentioned this in a post on this blog before, but I think I've mentioned it over on my Photography Instagram quite a while ago.

Five years ago last month, I was diagnosed with a Chronic Illness called Myalgic Encephalomyelitis or M.E. It's a Neurological disease & there's no cure for it, hence for it being a chronic illness. It impacts every single thing I do or want to do & that includes my photography as exercise & activity can cause the symptoms of the illness to worsen. This means I have to plan & pace out everything I want to do & have precautionary rest periods before an activity & also after to recover  - so I cannot do numerous things on consecutive days. Of course there is so much more to it but that is a basic overview, if you'd like to know more, feel free to send me a message with any questions, leave a comment below or head over to my other blog, Lo's Little Life as there is more information on there.

So like I said having M.E has impacted my Photography greatly. When I began to more into photography again, it was motivated by the fact that most of my other hobbies where just too active for me to part take in anymore but I felt that maybe I could make photography work within my new limitations.

Macro of McKay

I started by simply using my phone to take photos of my days in & around the house & then when I was bought my Nikon D3200, {I have since upgraded to a D7200} I began using that too. Now I had always loved Landscape Photography but trying to practise that was proving a bit difficult & I realised that I needed to venture into other avenues of Photography as having a creative outlet is definitely beneficial to my mental health.

So in time as I invested in a couple of new lenses, I opted for a Macro lens as well as a Telephoto one & began to make use of my little garden & realised I absolutely loved Macro Photography! So on days when I feel okay enough, I pop into the garden with my Macro lens, now the Micro NIKKOR 85mm {my first one was the 60mm} & make photographs of the flowers & items in the garden. The best thing about this is that it means I can play & experiment without having to go off to find a location which my health would really struggle to do.

Gerbera Macro
Then if I'm having a day where I'm really unable to manage getting in the garden but feel okay enough to pick up my camera, then my Cats make the perfect subjects! I'll either use my 35mm, 50mm or if I want to get some more detailed photos of them, then I'll use my 85mm Macro. Once the Cats get fed up of the Camera, though a couple of them actually love having their photo taken, I'll swap back to my Telephoto 55-300mm & if there's birds in the garden, I'll grab a few shots of them from the window.

I do still try, now & then, my health allowing of course, to go to my local beach & get some Landscape photographs but those trips, if though I'm only a 10 minute drive from the coast, mean I have to make sure I get plenty of rest before hand & have nothing else going on that same week. I also still love using my phone to take photos, as the camera on my iPhone 8 plus is just lovely, especially in portrait mode! This also means I don't have to leave my bed if I don't want to to take a few images of my surroundings & it helps me to document my life while living with a chronic illness.

First Photograph taken in Portrait Mode on my iPhone 8 Plus

I think that is one of the things I love about Photography, it can be adapted your given situation, you can make it work for you. due to the limits on my energy supplies, I try to make every hit of the shutter button count, so I take my time & really think about how I want the image to look & always try to get it right in camera rather than capturing anything & relying on the editing afterwards.

Also like I said, it can be such a benefit to your mental health as a creative outlet & even though it can have a negative impact on my physical health, I've found that even the post processing stage is beneficial & helps me remember that a few days in bed recovering were worth it. It also helps me cope on the worse days, looking back at images I've taken or reading through comments on my Instagram really does give me a little boost!

Sunset at the Beach

To me Photography is such a special thing & to be able to make it work within my limitations, is something I'm so very grateful for!

I'd love know what Photography means to you? Has it helped you find an outlet for a mental or physical health condition? Leave me a comment below to share your story if you want to.

Take care everyone,

Louise

Website | Instagram | Twitter | Facebook

AF-S DX Micro NIKKOR 85mm f/3.5G ED VR - My Thoughts

I've been using my Micro* NIKKOR 85mm for a few months now & I thought I'd share my thoughts. I will say for the record that I'm not an expert on camera lenses in anyway, so don't expect this to be too technical, it's just my overall thoughts of the lens in general. Also I am a photographer not a videographer so I won't be mentioning any of the video features within this post.

{*Micro is Nikon for Macro}

I already own the AF-S Micro NIKKOR 60mm f/2.8G ED lens & absolutely loved it but I was after something that could give me even more detail & enable me to get closer to my subjects. After doing a bit of hunting online & reading reviews & comments, I settled on the Micro NIKKOR 85mm. I did also consider the Micro NIKKOR 105mm but it is double the price of the 85mm... one day maybe! But since I'm on a APS-C sensor the lens focal length goes up to about 127mm {crop factor 85mm x 1.5}


While this is technically a Macro lens, I've found it quite versatile & gives a nice result even when you're not wanting to be so close to your subject, it would probably make a nice portrait lens although that's not what I'm using it for, unless you count taking photographs of cats as portraits!

Now for the sort of technical information as I'm sure you'd like to know some of the specifications*:

  • Minimum Aperture: f/22
  • Maximum Aperture: f/3.5
  • Minimum Focus Distance: 0.286m/0.9ft
  • Filter Attachment: 52mm
  • Lens Construction: 14 Elements in 10 Groups {with on ED Glass Element}
  • Diaphragm Blades: 9 {rounded}
  • Weight: Approximately 355g/12.5oz.
  • Diameter & Length: Approximately 73 x 98.5mm/2.9 x 3.9in.
*taken from the Nikon website.

The lens features Nikon's Vibration Reduction technology, which helps stabilise your hand held shots, a feature I find so helpful & really a must for me as I mainly shoot hand held but have quite shaky hands at times.

Another nice feature in the lens is the Silent Wave Motor, this means the lens provides fast & quiet internal autofocusing, it also gives the lens a nice switch over to manual & the focus ring is lovely & smooth to use in this mode. It also has a Super Integrated Coating which helps to eliminate ghosting & lens flare.

Okay now the specs & features are just about covered, I'm sure you're wondering how the lens is to actually use. Well I've found it nice & straight forward to use on my Nikon D7200 & there's no limited function as the lens is optimised for DX Cameras. {Nikon's CPS-C Sensor cameras} The autofocus modes work well, though sometimes it can take it a little bit to focus on your subject & it rolls back & forth now & then. Sometimes this was purely my fault as I was getting that bit too close to my subject but other times the camera was just taking its sweet time to figure out what it actually wanted to look at! Obviously shooting in manual mode eliminates this, but, if like me, you switch between the two, it's something to just be aware of if you're in auto mode.

I don't shoot for majorly long periods of time, {for reasons that will be saved for another post I'm planning} my time limit is usually around 30 minutes & in that time I don't feel like the lens plus my Nikon D7200 feel too heavy & I have shaky, weak hands at times. Though I don't think the weight of the two would really be an issue if you were using all day. I've also used my MeFOTO Roadtip Tripod & there's no lens dip {if you use heavy telephoto lenses you know what I mean} due to it's weight.

So I guess I should share some the photographs I've made using this wonderful lens, because I'm sure that's what you're all waiting for {I know its the first thing I like to see when checking out lenses}

The first photographs I took with this lens were of my cats, because if you follow my photography Instagram you know I'm a bit of a crazy cat lady who loves using a Macro lens for getting those cat photos!

Aperture: f/4.0  Shutter Speed:1/10  ISO: 800

I was really pleased with how the shots came out & thankfully my cats are all use to the camera, so weren't too bothered to have it quite close to them. I've been after a lens that could pick up even more detail in the cat's fur & eyes & personally I feel the 85mm does this really well.

I then headed off into the garden to test out the lens. Again I wasn't disappointed, the lens did really well with everything I pointed it at. I even managed to grab a shot of one of the Frogs in the pond. I'm not going to say all the shots were super sharp because they weren't & that was more me than the lens I feel as it was my first time using it for flower/nature photography.

Aperture: f/5.6  Shutter Speed: 1/500 ISO: 800


Aperture: f/4.8  Shutter Speed:1/350  ISO: 400 EV; -1


Aperture: f/4.8 Shutter Speed: 1/500  ISO: 400 EV: -1

As I said at the beginning of the post, this lens is really versatile & I was nicely surprised with the shots I captured by simply standing under my Japanese Maple Tree & pointing it upward, something I like to do with my NIKKOR 35mm lens. As you can see you can get a nice bokeh with them lens when you this.

Aperture: f/8.0  Shutter Speed:1/1000 ISO: 400

As I predominantly shoot in Monochrome, it was to good to see that in this mode, the photographs still looked great & the tones where nice & even. The same is true in all of the colour modes, even in Vivid mode, which is my colour mode of choice, it doesn't look like someone has put the saturation option to 100! 

So overall, the AF-S DX Micro NIKKOR 85mm f/3.5G ED VR is a really great lens for photography; especially if you are part of the Nikon family & wanting to delve into Macro photography more & want a decent, reasonably priced lens, it's currently about £400 on the official Nikon U.K. Store Website  It was about £60 more when I purchased it {in March} from Wilkinson Camera {my usual go to for camera stuff}, it's now just under £390. There's also a cash back offer going on with Nikon at Wilkinson right now so go check them out if you're in the U.K. {Nikon & Wilkinson are just my preference for kit & information, there are plenty of other great camera shops that you will be able to get this lens from.}

If you have this lens then please leave me a comment below telling me what you think of it or if you have any other recommendations regarding Macro photography that would help me to improve. If you have any questions about the information in this post or one everything else on my blog, then feel free to send me an email via the "Contact Me" box in the side bar & I'll do my best to get back to you as soon as possible.

I hope everyone is doing well & having fun with their cameras.

Take care,

Louise.

No Photography Show

I know some of you will be waiting for my post telling you all about my time at The Photography Show. I was all packed ready to go, but late last Thursday night, due to unforeseen circumstances, I made the decision not to head to the show. Though looking at what the weather was like in Birmingham, I think it was a blessing as I don't fair well in snow!

Even though I wasn't at the show, a couple of my photographs were: One of them is featured in Phot-R's catalogue which you could pick up at the show & the other was part of Loxley Colour's The People Gallery & my lovely Twitter friend send me a photo of it! I should be receiving my Alumini from the gallery in the next week or so.


Now when I was planning my trip to the show, I made a little list of the items & stands I wanted to check out & the odd things I wanted to purchase. So as I was unpacking on Friday, I decided I wasn't going to let the fact that I wasn't attending the show stop me from treating myself to the items I'd planned on buying while there. Thank goodness for online shopping!

First stop on my little online shopping trip was FujiFilm to order my "treat" item - a Instax Mini 90 Polaroid Camera.

Instax Mini 90

The camera comes with 10 colour Polaroid films but I also bought 2 double packs of colour film & 4 packs of Monochrome film as I mostly shoot in monochrome with my DSLR, so I wanted to have this option with the Polaroid. So in total I have 50 colour film sheets & 40 monochrome ones. The film is really easy to insert into the camera & the few photos I have already taken with it have been good quality. I started out on film, so it's nice to be dipping my toe back into it. I do also have my Dad's 40 year old Olympus film SLR, which I want to try & find film for to see if it still works!

Polaroid Films

As with most cameras, it comes with a nice strap that is easy to fit & I also got myself a case so my camera will be protected. The case for the Mini 90 is really good quality & is two cases in one; the front part of the case clips off, leaving the bottom part on to protect the bottom of the camera.

Case & Strap

Now for the essential items... I have three drawers {yes three!} for all things Camera & tech related, this includes all the cables & chargers for said cameras & tech. Try as I might, I can never make them look neat & tidy for very long as those cable seem to have a mind of their own! So I've been meaning to get myself a few cable management pouches for quite a while. I spied out the ones I wanted on Wilkinson Camera but sadly they were out of stock, so I headed to Snapper Stuff's website instead & managed to find them on there.

Think Tank Cable Management 20 & 30 both V2.0

I have to give Snapper Stuff a big shout out as their delivery time was incredibly fast! I ordered these on Tuesday & they arrived on Wednesday! I'm hoping to get all my cables organised over the weekend. I had also ordered a Think Tank pouch for my Apple product chargers but sadly it was out of stock & so Snapper Stuff kindly sent me a MindShift pouch, which arrived about an hour ago. {hence no photo}  It comes with 3 of the same ties as the Think Tank pouches & even though technically it's for a GoPro charger, it fits two of my Apple chargers perfectly; actually my 3DS even fits in it, which is good to know for when I'm traveling anywhere & want to take my 3DS with me!

So those were my "No Photography Show" purchases. I also wanted to look out for a 2TB Hard Drive as a back up to my WD My Passport one. I was thinking of getting another WD one but if you have any recommendations, then please do leave me a comment below.

I also originally had a Macro lens on my list of show purchases, but I decided to buy that a few weeks ago from Wilkinson Cameras instead of getting it at the show. I'll do a post about it once I've used it a bit more.

I hope everyone that made it to the show had a great time. I was sad I didn't make it, but I enjoyed catching up on what was going on via a few people I follow on Social Media. Since I've missed this show, I might go to Digital Splash later in year since it's actually closer for me to travel to & I'm in the process of sorting out entries to the Digital Splash Awards. I made the shortlist last year in one of the categories & would love to try again this year. I also have the Amateur Photographer of the Year on my radar to enter a few categories of as well.

So hopefully seeing my little purchases will sort of make up for no write up on the Photography Show itself.

Take care everyone,

Louise

The Photography Show - The kit I'm taking.

Since I'll be heading off to The Photography Show this Friday, I thought I'd put together a little post to show you the Camera kit I take with me. I'm not at the show in any official capacity, so what I take it purely for me to take photographs around the show, hotel & the area near the NEC.

Nest Roller Case:

I purchased my roller case last year at the show & it has been such blessing & piece of mind for me when I travel further a field with my camera & multiple lenses as it gives great protection to my kit. I didn't want something too big & when I came across this case, I thought it would fit my needs perfectly & it didn't break the bank!

Nest Roller Case

It has plenty of extra pockets & compartments along with the partition sections for housing my camera gear. Each partition has velcro sides so they can be moved to fit the size of the lens I need it to hold. There's a pocket on the inside which easily fits either a laptop or in my case, my iPads Pro & Air 2 {I'll be leaving my Mac at home}.  It has a Tripod strap so if I was taking my Tripod, I wouldn't have to grow an extra arm to carry it & each zip has a little "tag" on it which makes it easier to use. I also love the bright orange inside of the case as this makes seeing my kit easy {we've all had those black lined bags that our kit seems to go missing in!}

Camera:

Nikon D7200

My camera of choice is my trusty Nikon D7200 which I'll have had for exactly a year on Friday as I traded in my old faithful Nikon D3200 at last years show. I'll obviously be taking it's charger along with a spare battery & as it has 2 SD Card slots, I'll have my Eyefi  32GB card & a Sandisk 16GB card with me. These are the main cards I use & I especially love the Eyefi as at the end of each day I can transfer my photographs to my iPad Pro to look over as the card has it's own wifi. I know my D7200 can do that too via it's own wifi, but I find the Eyefi app easier to use that the Nikon app.


Lenses:

My Glass

The lenses I'm taking are my 18-55mm kit lens, 35mm lens & 55-300mm. These are my favourite "everyday lenses."

The 55-300mm lives on my camera body as I use it to take photographs of the Starlings that live in the roof of my house. I take this lens mainly for if I am able to have some time photographing the area of wood behind the hotel I stay in & the lake in front of the NEC.

The 35mm I use for around the hotel as the one I stay in has some very photogenic features to it, especially in the lobby & I've found that the 35mm is great at capturing them!

Lastly the humble 18-55mm kit lens, which I feel can sometimes be underestimated. This is my lens of choice for capturing scenes around the show. It gives me the option of a nice wide shot or a more zoomed in one. It's also nice & light which is plus when you have to carry it around all day!

Accessories:

Lenspen & Spare Battery Case

I know I said above that I'll have a spare battery with me, but I wanted to just mention that it's being kept safe inside it's fairly new home - the Think Tank Battery/SD Card holder. I don't know why it's taken me so long to get one of these but I absolutely love it! It fits the battery with it's cap on nicely & just gives that extra bit of protection.

Last but certainly not least, I'll be taking my trusty Lenspen with me. If you've never come across one of these, then I urge you to invest in one! It's such a great little tool to keep your lenses & camera body nice & clean, with it's soft brush at one end & pad at the other. It definitely makes the task of cleaning your kit not much of a task at all!


So there we have it, that's what will be with me this weekend. I've also got my show tickets & N-Photo show guide in one of the pockets of my case already so I don't forget them!

I was thinking of taking my 50mm prime with me but I favour the 35mm over it, controversial I know! There's so many photographers that love their "Nifty Fifty" & I do really like the quality of the shots I make with mine, but I always find myself reaching for my 35mm more than my 50mm {maybe it's just the type of photography I do that suits the 35mm better} when I'm shooting around the house & garden.

Are you going to The Photography Show? Let me know in the comments below what you're looking forward to while you're there. If anyone is going, have a fabulous time & maybe I'll see you there!


Take care,

Louise

Photowall - Review *Sponsored Content*

This blog post is brought to you today in association with Photowall. I was contacted by them & asked if I'd be interested in working with them on a blog post. After checking out their website & the products they offer, I agreed & as a thank you, they have kindly given me a 20% discount code for all of you, my lovely readers!

You're probably wondering who Photowall are & what they do? Well let me tell you...

Photowall are a Swedish company with a passion for design & quality. They offer a choice of wall murals / wallpapers {a great option if you're wanting to add a personal touch when you're decorating your living or work space!} & Canvas Prints. All are environmentally friendly, fire-retardant & won't fade in the sunlight, which is a great as there's nothing more annoying than sun bleached wallpaper or wall art! The printing ink they use contains no solvents or hazardous chemicals, & is biodegradable.

They can create unique, inspiring wall décor & work with talented photographers & designers from around the world. They also offer you the opportunity to use your own photographs to make your wallpaper or canvas print even more personal. Photowall also work with licensed brands & are an official partner for Disney, Modesty Blaise, Moomin Characters & others. So they're the place to go if you want to have for your favourite film star on your wall!

They use cutting-edge digital printing techniques to guarantee quality & precision on all their products. Customer service is also a priority & they aim to give their customers the best service they can!

Photowall also work with an organisation called Vi Agroforestry who are an Swedish aid organisation. Every year they plant 5,000 trees in the area around Lake Victoria in Eastern Africa. The trees help to fight poverty, improve the environment & combat climate change. So by shopping with Photowall, you are supporting Vi Agroforestry & doing your bit for the planet, which is pretty awesome!

So now you know a little bit more about them, I'm going to walk you through placing an order with them. Photowall kindly offered me a free canvas of one of my own photographs for working with them, so I'm able to give you a full honest review from start to finish; how the order process works & what the quality of the finished product is like.

Let's get started:

1} First thing you need to do is head to Photowall.com & then select either the flag of your country or the little globe for "Rest of the World" if your flag isn't listed.


Photowall Homepage


2} Now you choose your product type by either clicking on "Wall Murals" or "Canvas Prints" & then selecting either "Categories" or "Custom"  - I chose "Canvas Print" & then "Custom"

  • "Categories" will show you all the photographs you can choose from, split into different themes including "Animals", "Landscapes" & "Film, TV & Cartoon" 
  • "Custom" takes you to a page where you can upload your own image - which is the option I chose.
  • You also have the option of choosing either "Designers" "Rooms" or "Colours" which allows you to search & view images via these options.

3} If you chose to use your own image, now is the time to choose the photograph you want to use & upload it. You do this by simply clicking "Select You Image" & then "Upload" 
  • When doing this, remember the bigger the pixel count, the better the quality. A good guideline is that the image must have at least 1 pixel for every millimetre of the wall mural or canvas.
  • If you go to the "Price Calculation" tab in the box on this page, you can play with the product size you want & see how much this will cost.

4} Next you will work your way through the following 5 Steps:

  • "How do you want to order" - Choose "Order direct" if you don't have any special requests for your image. If you need some more help like colour correction, adding or removing an object, changing proportions or anything else you want doing to your image, choose "Personal assistance please" You then leave your contact details with what you want doing & someone will get back to you, usually within 1-2 business working days. ***Please note there is a charge of £36 per hour for this service but only if they do any editing, queries are free to send.***
  • "Framing" - either choose "With a do-it-yourself frame" or "Canvas only" The canvas doesn't come fully assembled, as there is a risk of it being damaged in transit. So if you want your canvas to hang on the wall, it suggests including a 29mm frame that you then fit to your canvas print. I chose to have the frame.
  • "Edge" - this gives you the option of either having your canvas image wrapped {your image continues around the sides of the canvas} or alternatively you can have either a black or white edge. I chose image wrapped.
  • "Your dimensions" - This is where you choose the size of your canvas. You can change the measurement to inches if you don't like working in centimetres. What's nice is that, as you play around with the sizing, you can see it applied to your picture & where it would be cropped & where the edging would be. This helps you choose the best size to show off your image. Mine looked best at 100cm x 50cm & I only lost a bit of the sky.
  • "Crop as required" - This brings up your image full screen so you can get a closer look at where the image would be cropped, based on the size you have chosen. You can then move the marked out red box to choose how you want the final image to be cropped ready to be printed onto the canvas.
Once you've double checked that all the options you have chosen are correct, just click "Add to Cart" & you're almost done!


Adjusting the canvas size.


5} On the "Your Cart" page, under the details of your order & the price, you'll find a clickable link that allows you to add a discount or gift card code. Here's where you can enter the 20% discount code I've been given for you all: 
  • My 20% discount code is: LoPhotoCampaign2018 {The code is only available for 30 days, so you need to place your order by the 5th of April}
  • Make sure "Private Customer" is selected {unless you're a Business of course, then choose "Business Customer" or "Contract Customer"}
  • You can also tick or untick the box to decide if you want to receive emails from Photowall telling you about any offers & the like.
Once that's done, simply click on "Proceed to checkout".


6} The next page is "Confirm your order" This is where you need to add in your billing address, name, phone number & email.
  • If your delivery address is different to your billing one, just select "Other delivery address" & add in the address you want your product sending.
Once you've doubled check your details, click "Proceed to payment"


7} As my canvas is free I was taken straight to the final order confirmation page. But all you'll need to do is add in your payment details & then complete your order.
  • You can pay either with Visa, MasterCard or Paypal.

8} That's it! You'll receive an email confirming your order & then another one once your order has been dispatched to you.
  • European orders are free & will take between 3 - 6 business days. The orders are delivered by DB Schenker
  • The Rest of the World takes 2 - 6 business days & there is a charge ranging from €19 - €49. These orders are delivered by DHL Express.


I placed my order very late on a Friday night, received my confirmation email & then received my dispatch email on the Monday. My canvas arrived on the Thursday, which I was really surprised at due to the incredibly bad weather that's going on in mainland Europe & the UK right now! So from ordering to delivery took 4 working days & the canvas arrived well packaged in a sturdy box, so it's very protected in transit.

As the canvas doesn't come with the frame already fitted, you'll need to do a little bit of "D.I.Y" & fit the frame to the canvas. There are instructions included on how to do this, along with all the brackets & screws you'll need. Photowall also have a handy tutorial video on Youtube to help with this.
You can watch the video here or simply search Photowall on Youtube.

Now let me just say for the record that I'm not the biggest fan of canvases for wall art as you can often see the texture of the canvas material through the image that's been printed on them & I find that distracted from the image itself. Photowall's canvas is completely different! It's incredibly high quality & as it's 100% cotton, it feels lovely. The print is stunning, my photograph hasn't lost any of the detail I captured & you can barely see the texture of the canvas as it's so smooth! The only tiny little issue was a couple of loose threads from where the canvas had been cut to size but these were easily sorted by cutting them off. 


As for putting the frame together, my Dad actually did this as I'm an even less D.I.Y person than he is! As he said; "If I can do it, anyone can!" It's that straight forward! Having the Youtube video in addition to the instructions was very helpful, especially as my Dad said he prefers to watch tutorial videos rather than use written instructions.

From helping my Dad fix the frame to the canvas, I recommend taking your time as it's important to make sure that each part of the frame is straight & flush to the edge of the canvas as once stuck down, it would be very hard to take off again. Not rushing, it took less than 30 minutes.

The main tip from my Dad; Peel the tape from the frame pieces carefully! Part of the glue from the tape came away on one of the edges, which wasn't a major issue as the part of the canvas it effected was one of the corner pieces that fits between two sides of the frame so once the frame was completed, you couldn't tell.

It's nice & sturdy so it can stand up without falling yet it's lightweight, which means you're not having to struggle with it being heavy while you're hanging it on the wall with the provided bracket. Okay sure having to fit the frame onto the canvas can seem like a bit of a faff but it went together well & with no issues other than the tape not peeling quite right on the first piece - but that's more of a tape issue that an issue with the frame.


One of the aims of any photographer {well for me anyway} when they are looking to display their work is to find a product that will really show off the image they have captured & to find a company that takes as much care in printing & producing that product as the photographer has put into the making of said image. I feel I've found that with Photowall. Honestly, I'm such a big critic of my work & when I see my images printed or framed, I find myself scrutinising it, looking for ways I might make it better. But the quality of the print job on this canvas makes my photograph look incredible & as such I found it hard to pick up on anything I didn't like.

Overall, my impressions of Photowall & their canvas are excellent & I'm not just saying that because they're sponsoring this post & have sent me a canvas to review. I can honestly say that Photowall make top quality canvases & I think they may have converted me into a canvas lover! So I really do recommend them if you're thinking of getting a new piece of wall art or you're redecorating & after some unique wallpaper. Plus if you do buy from them you'll have the nice bonus of 20% off if you use my discount code: LoPhotoCampaign2018 {valid for 30 days; 5th March - 5th April}

Please let me know if you do use the code & order a canvas or wall mural from Photowall, I'd love to know what you think of them. Also if you have any queries or questions regarding the order process or want more details on the canvas or photograph, please feel free to either leave me a comment on this post, tweet me or email me.

All done & on the wall!


I hope you are all as well as can be & keeping warm in this incredibly cold weather.

Take care,

Louise

How I Instagram

I always enjoy scrolling through Instagram & checking out other photographers galleries. I love each how photographer builds their gallery, some seem to have a theme & others just post what they shoot without considering if the next photograph will go with the one before & it just works.

When I started my Photography Instagram, I just uploaded my favourite shots, not following any theme, pretty much like my personal account. Then while completing my project for my course, I found I really enjoyed the process of putting photographs together along a theme, to tell a story.

So I began to implement this into my Instagram & here's how...

1} 1 Row = 1 Gallery.

For me, instead of having an overall feed theme {thats a tongue twister!}, I decided viewing each row of three posting spots was more beneficial. Each row is like it's own little gallery.

An Instagram Album helps keep your future posts organised.

2} Theme Within The Gallery

I know I said I don't have a feed theme, but, in order to show each row is its own little gallery, the group of three photographs need to be cohesive.

3} Choosing Photographs

Once I'm done with the post processing stage of my work flow, I then go back through my shots & begin to look for ones that will go well side by side. One example of how I do this is say I've been in my garden taking photos. Instead of just choosing three different shots, I'll section these into groups of the different flowers or garden items I've captured. From there I'll choose my three shots & add them into my "Instagram" Album.

4} Do They Go Together?

Finally, I double check the chosen shots in my "Instagram" album, as I can see them side by side before I post them. This when I also swap out a photograph for another one if I feel they don't look right together.

Sneak Peak of my Instagram posts!

5} 1 Row + 1 Gallery = 1 Feed!

Even though I treat each row as it's own gallery, with its own little theme, because I post each set of three from a day where I'm capturing similar shots, they work well together. When I'm posting images from different days, the change in the theme, for example garden shots to cat photographs helps to break up my gallery.

6} Black & White Or Colour

Since I predominately shoot in Monochrome, my Instagram is mainly a monochrome filled gallery. However, I do feel some scenes call for colour & so to help break up my gallery, I will post a set of three in colour.

7} Posting Your Set of Three

Once I have my set of three photographs, I then post them through the day, giving about 4 hours between each post. I struggle at times with a caption & I usually end up rambling about my day. I also add in brackets 1, 2. or 3 of 3, depending on which photograph I'm posting.


My instagram Gallery

8} #Hashtags

If you're using Instagram to get your work seen, hashtags can really help. Choosing the right ones can go a long to promoting your account & photography. I have a set of hashtags I use for every post I do {I copy & paste them on each post} Adding ones that photography companies who feature a photographers work use, is a good place to start. This has paid off for me a couple of times, the most recent of which being a lovely feature from Jessops!

So there you have it, that's how I Instagram. If you'd like to check out my account {link below} to see the result of all the above steps, then please have a nosey & tell me what you think.

If you have any other tips or tricks in using Instagram to show case your photography then please feel free to leave a comment below.

I've also just added a few new images for sale on my website. The link is below if you'd like to check them out & maybe you'll find something to spruce up the walls of your home.

Take care,

Louise


Kitchen Table Studio

I came across the concept of a "Kitchen Table Studio" when I was doing my photography specialisation a couple of years ago. The basic idea is to turn your kitchen table {or dining room, as in my case} into a mini photo studio.

One of my professors set up a white cloth background & used little lump cubes as extra light sources & then set his camera up on a tripod. In his demonstration he photographed a few products, but you could use this set up for any type of photography you wanted. You can also vary the kit you use & go all out with different lights, colour backgrounds or maybe you'd prefer a more minimal set up, just your subject, your camera & maybe a back ground or small light source.

Table, iPhone 8 Plus Torch & Plants.


On Tuesday I decided to venture into the garden to take a few photos, something I've not done for a little while. however, it was so cold & the breeze wasn't helping the fact I wanted some Macro shots. I took a few shots & then I'd had enough of battling the wind & cold, so I picked a couple of Hydrangea petals, a sprig of Crocosmia & a Lily Seed Pod, all of which had seen better days.

I put them on my dining room table & decided to take my photographs there. Although I have soft boxes, one of which I use as a light for my room, I just turned on the ceiling light. My background was one of our black placemats, which I held in my left hand. I also have a tripod but I decided to stick with my usual handheld approach. I like to move around when I take photos, especially when my subject can't move, moving around also encourages you to change up your vantage points & try new angles.

Hydrangea Petal Veins

So I began to play with how close I held my background placemat, how much light I allowed on my subject, how it looked with the plant in silhouette & how sharp the shadows were. Playing with the angles & vantage points, even using a chair to try a "birds eye view" shot. As I was playing around with the Hydrangea petals, I realised when the light was behind them, you could see through them & seen all the veins & little sections they split into. So I grabbed my iPhone 8 Plus & turned on the torch. I lent it against the back of one of the chairs & used it to back light the petals & I also used this light source to make the shadows even crisper.

I am predominantly a black and white photographer, shooting in monochrome more than colour & doing conversions. However, I did switch a little bit to a colour setting as I was taking photographs of the Lily Seed Pods as I notices the light from my iPhone torch was picking up a golden tone from them even though the looked quite black.

Crocosmia Silhouette 

Overall I spent about an hour at the most playing around with my minimal "Kitchen Table Studio" & going through the shots later, I was really happy with how a number of the shots came out. I had a lot to go through but throughout Wednesday I checked & minimally post processed them. My first attempt at a "Kitchen Table Studio" went well, even if I did have a minimal approach to it. This type of photography set up is something I definitely want to do more often & I think will really help with a couple of projects I want to give a go in the future.

See Through Petal

Have you tried this "Kitchen Table Studio" set up? What kit did you use & what was your photography subject? Do you have any tips on how I can improve my set up {other than using my soft box & background} Please feel free to leave your suggestions in the comments.

On a side note, I'll not only be posting a selection of the shots to my Instagram in the coming weeks be adding my favourites to the "Macro Magic" gallery on my website & making them available to buy, so be sure to keep an eye on the site. {link below} If you follow me on Instagram & love a photograph I've posted & would like to buy it, just leave me a comment on the post & I'll add it to the site for you.

I hope you're all doing well & the cold weather isn't hampering your photography.

Take care,

Louise

Website: Lo Elizabeth Photography

Photography Website Launch

I have a Photography Website!

Home Page
I've been toying with the idea of setting up my own photography website & selling my work for quite a while. I've held back due to lack of confidence more than anything, I was just not sure if my work was good enough, if anyone would actually want to buy anything.

However, despite that lack of confidence, I found my curiosity took over & I began researching which website provider would be best for me & which printing labs they used. I even picked up information on a couple of them while at The Photography Show back in March.

Uploading Photographs
Then last month I posted a photograph on my personal Instagram & one of my friends asked if they could buy a print of it. I then realised that maybe people might like some of my work enough to want a copy of it. So I began to plan out my site; how I would like it look & feel, what photographs might be good to have for sale & also the cost of it all.

I finally settled on Smug Mug as my provider for a few reasons but the main one is that the print lab they use for the UK is Loxley Colour & I've been using them for almost three years now. Their products are good quality & their delivery time is brilliant so I wanted to make sure that if I was to start selling that I could still use them as I know that my customers would be getting great quality products. My discount via being an N-Photo subscribe was a nice bonus!

So last week I signed up to Smug Mug & began to build my website. I wanted something that was fuss free & clean looking. I remembered at a Pro Photographer Masterclass I attended that a couple of photographers mentioned that they had their sites set up to look very similar to Instagram in how the photographs were presented, it gives the site a familiar feel. So I decided to go for a similar look myself & I really like how it's turned out as the photographs are nice & easy to view.

Key wording - A necessary but long job.
I've found Smug Mug really straight forward to use as they section each element you can add into "Content Blocks" so you just simply add the blocks you want & tweak them to how you want them to look. Adding photographs to the galleries is quick too, with a drag & drop facility, the only long job I've found was adding keywords to the photographs once they're in the gallery.

I was also very impressed with their customer service, not long after I'd signed up I received an email from one of their team introducing themselves which was lovely & when I contacted them regarding a price list query, they were very quick to get back to me, despite the time difference {they're based in the US}.

Overall I'm really happy with how my site looks & I'm even happier that I've decided to give selling my work a go!

Galleries

If you'd like to have a look at my site, then please click the link below:

Lo Elizabeth Photography

I'd love any feed back you have on the site. I've tried to add a nice selection of different types of photography for sale, ranging from Macro to Landscape. I plan to go through my catalogue of photographs & add more as time goes on but I think what I have on there is a good starting point.

I want to thank you all so much for all the support you've given me this past year, especially over on Instagram & Twitter. I hope this coming year is a good one for you all!

Take care,

Louise

Family Shoot

It's very rare for me to take photographs of people or children & it's even rarer for me to work in a "Studio Set Up." So when I was asked to do a Family shoot, although I said yes, I was quite nervous as the only times I'd done that type of photography was a couple Maternity shoots. The great thing was that this shoot was for the same person with her husband & her little ones. Another great thing was that they are actually part of my family, which I know at times can be hard to work with but my niece & her family are wonderful & made the whole experience a great one.

We had the shoot booked in quite a while in advance & this gave me time to get prepared. I read a few articles on Family Shoot set ups & while at The Photography Show in March, I bought a Lens Buddy which is a Monkey whose tail wraps around your lens & squeaks; this was to help keep the kids attention. I also invested in a set of soft boxes & a background from Phot-R. These were all reasonably priced & didn't break the bank since I knew I wouldn't be using it regularly. {Though one of my soft boxes is being used as a lamp for my room!} I decided to get the background as I don't have any rooms in the house that are white & we wanted a nice clean background.

Phot-R Background
A month or so before the shoot, I got together with my Niece & I made a note of the type of shots she wanted & showed her the Loxley Colour catalogue so she could see the products they did & what I would be able to do for her if she wanted any shots printed or framing. what I found helpful was that she had some photos I could use as a reference as she wanted some shots of her little boy to be similar to ones she had had done of her daughter at the same age.

The night before the shoot my parents & I turned our dinning room into a "Photography Studio." We moved out the table & chairs, pushed the little sofa we have in there into the corner of the room & put up my background & soft boxes. the next day before my Niece & her family arrived, I took some test shots of my mum to make sure my white balance & ISO were set right & the background looked okay. I also transferred my shot list from my photography project notebook onto my phone so I had them to work from. I also set up my iPad Air so I could connect it to my Keenai SD Card so I would be able to see the shots I was taking while I was shooting.

One of two Phot-R Softboxes
We worked our way through the shot list, taking a break half way through so the kids could play a little bit before we started again. this break also gave us time to look through the shots I had already taken & thankfully my Niece was liking everything so far. Once we'd all had a breather, we started again with the shoot & finished off the last shots on the list along with some extras.

Even though this isn't my type of photography, my Niece & her family made it really easy & enjoyable. The kids were great in front of the camera; my Great-Niece loves having her picture taken so I knew she would be fine but I wasn't sure about my little Great- Nephew as he was only about 8 or 9 months when we did the shoot. But he was so good & when I was taking shots of just him, he happily sat on the floor of my background smiling & laughing at "Kevin" my lens Monkey while I took some shots of him.

My gorgeous Niece & her family
The shoot was about 2 hours in total & once I'd finished, I went through the shots on the iPad before they left & had my Niece chose which ones were her favourites, as those were the ones I would post process. That night my parents kindly took down my background & soft boxes & put the furniture back as {long story short} I'd become really ill. Due to being ill, I had to put off my post processing  for a good week or two but thankfully my Niece was really understanding & didn't mind the delay at all.


USB & Box

Once I had finished all the post processing, I went onto Loxley Colour's website to sort out the products I was getting for my Niece. I had put together a "package" for her which included a USB & presentation box, which I had personalised & a triple frame to match the one she already had. I really do recommend Loxley Colour for anything Photograph related, their service is wonderful & they have a great selection of products to offer your clients & the prices are very reasonable for very high quality products.  The order turn around is really good too; the USB & Box arrived within 5 days of ordering & the frame took exactly a week, including the weekend.

Framed Prints
Even though I am very much a nature/wildlife/landscape photographer & love being in my garden with my camera, doing this family shoot was a great experience & helped to stretch my skills not only behind the camera but also in post processing as checking & editing a family shot is very different to checking & editing a shot of a flower!

I'm so happy with how the shots & so is my Niece, which as any photographer working with a client will know, what a relief that was! So even though this isn't my type of photography, it's something I now know I could do with confidence.

Take Care,
Louise

Stuck Filter - What to do?

I very rarely use filters on my lenses, this is probably down the type of photography I'm mainly doing at the moment {garden & birds} If I were doing more landscape I might use them more. That being said I do own a number of different filters; I have a kit of square filters, both ND Grad & ND in varying colours & densities, that attach to the lens using an adaptor. I also have a few cheap circular ones, UV & Polariser, which simply screw onto the end of the lens. Out of all of the ones I own, I've used the circular Polariser one for my 55-300mm lens the most & even then, I've not used it a lot.

Now if you follow me on Twitter or Instagram, you'll know that I recently got my Circular UV filter stuck on my beloved 55-300mm lens! I'm not entirely sure what possessed me to even put it on my lens. I was packing my kit for my recent trip to Edinburgh & I think I had the thought that it might just help with any haze or glare that can come from shooting through a car window, something I'd be doing while away.

I had my roller case on my bed & ticking off my kit list as I packed it {my camera with lens attached sat on the bed next to the case} & I slightly moved the case which knocked my camera onto the floor! Any photographer who has dropped their camera will understand the "almost had a heart attack" type panic that follows this happening! I straight away checked it over & took a few photos to make sure all was well {thankfully it was} It was only on the way to Edinburgh did I realise that the UV filter was stuck!

I struggled to take my lens hood off my lens {I pop it on my lens backwards so it's always to hand} & I think messing with the hood & getting it off, lifted the filter on one side. I then tried to take the filter off & it wouldn't budge! I tried a couple more times while I was away but had no joy. The only plus was that it was a UV filter & didn't effect the photographs I took at all. But I didn't want to leave it on there indefinitely. So when I came home, I ended up on Youtube to see if I could find any suggestions to help remove it & here's what I came across:

1) Rubber/Elastic Band

The idea is that putting a rubber/elastic band around the filter can give you some extra grip & this should help when trying to screw off the filter.

2) Another Filter

This uses the fact that you can stack filters & by using the additional filter on the stuck one, it should give you some extra leverage & the stacked filter should help remove the one below it. This is the one I had the most hope in working.

3) Flicking the Filter

I was really confused by this one as I'm not entirely sure how it works, but the person suggesting it says it does. You just sit & using your fingers, flick around the filter. The guy in the video did say it takes a while but eventually this action should help you remove the filter.

4) Filter Wrench

Call me a noob but I'd never even heard of this! For those that don't know, it's basically a wrench but made to be used on filters {obviously a massive give away due the name! I can feel you all rolling your eyes!} This, like the extra filter or rubber/elastic band is used to give more leverage & grip on the filter to help remove it.


None the above worked for me & yes I did indeed sit & flick the filter, {don't judge me, I was desperate!} which blooming hurt! I then headed to Twitter for help & also mentioned my stuck filter issue in a Instagram post. A number of the photographers I follow had some ideas as well as suggestions 1 & 2 above...

5) Cooling the Filter using a Fridge or Freezer

This is a risky one to try when the filter is stuck on a lens as the cold can damage the flex cables & plastics on the lens {as I was told by someone who does camera repairs for their job} He also said that they were okay to about -10C so the cooling in the Fridge might be okay. I didn't want to risk it.

6) Hacksaw

This one was also a no no for me. But if you're brave enough,  you can use a mini Hacksaw to cut the filter off or cut notches in the filter & then use something in the notches to help screw it off.

7) Send it away for Repair

Basically if all else failed, get a professional to fix it. There are a number of companies out there that can do this; your chosen Camera brand or a company like NRG Photographic. This for me was a last resort option as the lens is my most used one, it lives on my camera & I really didn't want to have to send it away.

Out of all these I only tried the first two as I was really worried about damaging my lens. They didn't work & I think the reason they didn't was because the filter wasn't flush to the lens, it was twisted & lifted on almost all of it. I think if it was sat on the lens properly, using the extra filter might have worked.

After a few failed attempts, it seemed more & more likely that I would have to send it somewhere to be removed. As a last ditched effort, while I was in Lancaster on Friday, I decided to take my lens to Wilkinson Cameras, my local camera shop. The lad in there tried a couple of things, including a filter wrench & a foam pad to try & give him the extra grip he needed. The issue wasn't only that the filter was twisted, as I have already said but it was also quite slimline, so there wasn't a massive surface area to work with.

After a few tries, he asked if I was in town for a while longer & could I leave it with him as the one thing he was sure should work wasn't to hand. That thing?

A mouse mat!

It was the last thing I would think of using but the underside of a mouse mat is designed to grip the surface it sits on so it doesn't move when you're using your mouse. So I wandered off round a couple of shops, met back up with the people I was with & then when heading back to the car, I went back to pick up my lens. When I went back in, it was a different guy behind the counter but after saying why I was there, I was beyond happy to hear the words:

"We've managed to remove it!"

I swear I almost cried! I was so happy & thankful & even after the hassle of removing it, they didn't charge me, which was just so kind of them.

So there you go, a bit of a story time type post with a few suggestions to try if you ever get a filter stuck to the end of your lens. If, though, like me you're worried about damaging your lens or the filter isn't just flush to the lens, I really do recommend taking it to your local camera shop & letting them have a go before sending it away to be fixed.

The offending filter has since been binned & my beloved lens is back on my camera where it belongs.
Moral of the story is {courtesy of the Wilkinson Camera guy}: Don't use cheap filters!

If you have any other suggestions for removing a stuck filter, please feel free to comment them below but I thought the mouse mat trick was a genius idea & I may have to invest in one as part of my camera kit essentials.

Take care,

Louise

My Work Flow

A big part of photography is something called Work Flow, which is basically the processes through which a piece of work passes from initiation to completion. Everyones work flow will differ slightly but will usually follow similar steps.  As I'm interested in other photographers work flow, I thought I'd share the process I take my photographs through & a few of the programs I use along the way.

Step 1:

This obviously starts with making the photograph, which I use my Nikon D7200 to do. Depending on my subject, will depend on the lens I use.

Step 2:

Once I've made my photographs, I need to get them onto my iPad Pro. Although my D7200 has Wifi capabilities, I prefer to use my Wifi Keenai {previously Eyefi} SD Card & App to do this. I just find it much more straight forward to use as once my iPad Pro is connected to the Card's Wifi, it uploads all my photos to the App. Once all the photos are uploaded, I then go through them & save all the ones I want to edit & check to the iPad's Camera Roll.
{Using the D7200's Wifi & App, I have to go through all my photos on the camera & select all the ones I want to upload - a major job when you're taking 100's of photos!}

Keenai App
Step 3:

Now it's time to do some post-processing or editing. My chosen program/App for this right now is Snapseed. It's such a lovely, straight forward App to use, there's plenty of options to help get your photo looking just right, including a number of different filters & as a bonus it's free! I'm quite minimal when it comes to editing my photographs, I'm not one of those people who when taking a shot think "I'll fix it in editing" I prefer to get it right in Camera.

When post processing I generally will up the Structure & Sharpen the image a little. Then I may alter the Brightness, Contrast, Shadows & Warmth {If needed} It's all about personal preference & the feeling I'm trying to convey with the photograph in question.

If I find something in the photo that draws my eye in a negative way, I'll either use the Healing tool in snapseed or I'll use an App called Retouch to remove the offending object if I can.

I have a number of other editing Apps which I'll also use if I decide to have a play & practise my editing skills. I think it's good to have programs/Apps that do lots of different things as it helps teach you how the different options can effect the exposure & look of your photographs.


My Editing App Options

Once I'm happy with how my photograph is looking, I'll export it & then I'll add my watermark using the Text tool in Snapseed & then export again. This means I always have two copies of the finished photograph which comes in handy in a future step.

Step 4:

Once I've finished the post processing, I then delete all the original unedited versions from my camera roll {don't panic, they're still on my SD Card} I then use my iStick & App {a memory stick with lightening connection on one side & USB on the other} to do my first backup. It simply plugs into my iPad Pro & then select all the photographs I want to copy onto it.

Step 5:

I'll then decide which photographs I want to share to my Instagram {I'm going to do another post in more detail on how I work my Instagram} & add them to my Instagram Album in Photos {this is why I always have a watermarked version}. At this stage I may also double check my portfolio & add any to that as well. Once I've done, I'll generally delete most of them so I don't have an overload of photographs on my iPad Pro {even though that's purely what I use it for}

Step 6:

Time for more backing up! Using the USB connector on my iStick, I plug it into my Laptop & transfer all the photographs to my Master Photograph folder, which is then broken down into Month & then date. In each date folder is "Edits" & "Originals" folders.

Once all the edited versions are on my laptop, I then get SD card from my camera & transfer all the original copies into the corresponding date "Originals" folder. After that, the SD card goes back into the camera & I format it.

The final backup I do once all my photographs are on my laptop is to copy them to my WD 1TB hard drive.
{I do need to give this a major over haul & get it more organised. I'm also at some point going to get another hard drive as an extra backup}

Step 7: {optional}

Print your photographs. This step is entirely optional of course & can come earlier in your work flow. You can either do this personally or send your photographs to a professional photo lab. This is not a step I personally do often {hence why I added it at the end} & when I do, I'll send my photographs to Loxley Colour to have them printed.

I would love to print my own but my printer decided to die the last time I tried to print a couple of photos on it. I'm hoping to be able to get a new printer in the future, but printing via Loxley colour isn't too expensive & the quality is amazing! Plus their delivery time is very fast if your wanting normal prints & nothing fancy or framed. I definitely recommend them.


Main Apps are all on the top line.

There you have, my work flow. sometimes I'm really productive & do all the Steps in one day & other times, I do them over a few days or a week. But one thing I will say, is always always always are sure you back up your photographs & have at least one back up of the back up. Laptops & portable hard drives can be temperamental creatures & so having multiple backups is definitely a safe guard just in case.

If you have any suggestions on how to make my work flow better or have any editing App recommendations, please leave them in the comments.

Take care,

Louise

The Photography Show ~ Day 2

{If you haven't read my write up of day one at The Photography Show, you can do that here}

I had a slightly later start on Sunday; so armed with my boxed up Nikon D3200 & D7200 + 18-55mm kit lens round my neck, I headed for the NEC around 11am. I'm so glad I had my camera out as I managed to get an amusing shot of a group of Jedi, who looked like they needed an extra dose of the Force! Although it's great to be there for the show opening, going that bit later was nice as there wasn't a massive crowd walking in.

More Force Needed!
My main agenda for this day was to trade my D3200 against a NIKKOR 50mm Prime & spare battery, listen to a couple of talks & have a general browse around the different exhibitors. So the first place I headed was London Camera Exchange where I said a sad farewell to my D3200 {it has been a fantastic entry-level DSLR & my constant companion for the past few years} & then I had a browse round the many stands & a few of the galleries. Although not on my shopping list, I was on the hunt for a roller travel case. Packing my kit for this trip made me realise that I really needed one & managed find a nice one from Nest which I was pleased with.

My wandering lead me to the Nikon School Stage. While waiting for a seat, I took advantage of the flower photography scene that was set up & took a few shots {if you follow me on Instagram, you know I love a good flower & plant shot} I then listened to a talk on Speedlights, which was really interesting, then listened to David Yarrow at 12pm. I absolutely love his fine art wildlife photography & he was so inspiring! I then had a bit of time before the next talk I wanted to listen to, so I headed back to hotel to drop off the couple of bags I had & got lunch.

Hydrangeas
I went back into the show around 2:30pm & headed back to the Nikon School Stage to listen to Richard Peters, who I'd seen last year. His wildlife photography is brilliant & his talk was about the process of getting better & learning to build from a shot & evolve shots you already have into something even better! The last talk on the agenda was at the Mobile & Social Media Stage {think that's what it was called}  all about iphonography/phone photography & was given by Sara Tasker. The main reason for listening to this one was for my mum {who was with me} She loves photography too {probably where I get it from!} but likes the convenience of using her iPhone to take pictures. Although I'm definitely a DSLR user, the hints & tips Sara gave about using your phone actually inspired me to start using my iPhone to take photos again, especially for my personal Instagram.

After this, I headed back to hotel, stopping off at ilex camera book stand {being the bookworm that I am} & pick up a couple of books. I also made a final stop at Fotospeed as I wanted to have a proper look at the #fsprintmonday gallery, which like The People's Gallery, I knew a few of the Photographers from Twitter. I also had a really nice chat with Emma about printing, who was so helpful & I came away with their tester paper packs.

Monday was our leaving day & after a busy weekend, we had a lovely relaxing morning before checking out at 12pm. I had planned to wander down the lake by the NEC but the weather wasn't great. So instead when we got a hot chocolate from the Costa in the hotel, I took my camera with my 50mm prime attached & got some shots around the hotel lobby before heading home.

Lobby Light
Overall the show was brilliant & for the cost of a ticket {around £13} you get so much for your money! There were so many shops to browse & free talks to listen to & learn from. There were also some nice set up scenes that you could take photographs of, though a few more of these would be great, as I feel like there were more last year. It was interesting to see the rise in the number of Drone stands & VR this year, so it's not just information on "traditional" photography that's on offer. So no matter which area of photography you're interested in, there's something for everyone!

Attack of the Drone!
I hope all those that attended the show had a fantastic time & if you'd like to know more about any of the kit I picked, see pictures of it or would like me to write a review on any of it, please let me know.

Take care,

Louise.

The Photography Show ~ Day 1

The Photography Show was on at the NEC in Birmingham from Saturday 18th - Tuesday 21st March; Monday is "Pro Day" & Tuesday is "Student Day". I was there for Saturday & Sunday, which I feel are more of the "enthusiast days" or for those maybe thinking about taking their photography further {based on some of the talks on these days} This is the second time I've attended the show, as I went last year as well.

I set off on Friday lunchtime & after 3 hours or so down the M6, I arrived at the hotel around 5pm. I then spent part of the evening finalising the talks & stands I wanted to listen to/visit, I did this using The Photography Show app & the paper guide that I'd gotten with my N-Photo magazine.

The show is held in Hall 5 & is open from 10am - 5pm each day. In correlation to the show, Capture Birmingham is also on, which gives photographers the opportunity to do photo walks around the city {I didn't take part in these though} An added bonus is that MCM Comic Con is also on at the same time & these two shows work really well together as everyone in Cosplay is happy to have their picture taken & the photographers are usually on the look out for an interesting subject to capture!

Armed with my app, paper guide & list of kit I wanted to get {having a list definitely helped me not get caught up buying kit I didn't need!} I headed over to the NEC, walking passed a group of Stromtroopers as went to the entrance. While waiting for the show to open, I had a wander round Loxley Colour's The People Gallery, which this year was in the welcome area. I was filled with pride, happiness & excitement as I came across my photograph of Jacob the Starling on display! It was such a privilege to see my photograph surrounded by so many amazing photographers work, many of whom I know via Twitter/Instagram.

"Jacob" on display in The People's Gallery

On the day's agenda was a talk/demo by Andrew Appleton on Dance Photography, a talk by Ben Cherry about following Berwick Swans from Russia to Europe & the "Turning Pro" masterclass. Shopping wise, my main goal was to upgrade my camera, sort out a subscription to N-Photo & also to find a lens accessory to help with a shoot I'm doing with a family next month.

Though expedition & dance photography are miles apart in many respects, Andrew & Ben were very inspiring & informative. Andrew also had a dancer with him, named Alexa Hilton, so as an audience we had the chance to get some shots as she warmed up & then did some moves as Andrew took her photograph. As Andrew mentioned numerous times, dance photography is all about timing & well my timing was slightly off when trying to capture Alexa doing leaps, but I did get a few nice shots of her warm up!

Andrew Appleton's Dance Photography Demo

At 2pm I attended the "Turning Pro" masterclass {I attended the beginners one last year} I listened to the first two sections which were very interesting but due to personal reasons I had to head back to my hotel not long after 3pm. I was disappointed as I missed the rest of the masterclass & missed out on meeting up with a few photographers I know via Twitter but it was out of my control. Even though I had to leave earlier than planned, I did managed to a few things off my shopping list; I upgraded my Nikon D3200 to the D7200, I was going to buy it from Nikon but I couldn't get near, so as I wanted a trade in price for my D3200, I went to London Camera Exchange & ended up getting it from there. I got a subscription to N-Photo sorted & came away with a free Manfrotto backpack! I also found a toy that wraps round my lens which will be perfect for my family shoot.

Back at the hotel, I uploaded the few photographs I'd taken to my iPad. Unboxed my D7200, boxed up my D3200 & put the batteries for both of them on charge. The rest of my evening was spent catching up on notifications/messages I'd had throughout the day & planning out Sunday's visit to the show...

My new Precious!

Day two coming soon...

Louise

{I've posted a number of my favourite shots from the show to my Instagram, if you'd like to have a look at them @l.e.sphotography }


Photography Basics & Beyond: From Smartphone to DSLR Specialisation

Back in January 2016, I enrolled in a Coursera Photography Specialisation run by two Professors based at Michigan State University. It was the first {& so far only} photography course I'd ever taken & I thought I'd share my experience of the course & what it entailed.

In its entirety, the Specialisation ran from February to September. But there are new start dates every month or so. The course was brand new to Coursera when I took it, so I was among the very first to complete it.

The Specialisation was split into 5 separate courses:

Course One: Cameras, Exposure & Photography
  • Week 1: Basic Principles of Photography.
  • Week 2: Camera capabilities: differences and similarities
  • Week 3: Setting up yourself and your digital camera: Menus, Settings, and baggage!
  • Week 4: Picture Decisions: The Vantage Point and Frame

Course Two: Camera Control
  • Week 1: Elements of Camera Control 1.0: Exposure
  • Week 2: Elements of Camera Control 2.0: The Lens
  • Week 3: Elements of Camera Control 3.0: Depth of Field
  • Week 4: Picture Decisions

Course 2 Week 3: Shallow Depth of Field Assignment

Course Three: Principle of Photo Composition and Digital Image Post-Production
  • Week 1: Elements of Design: Building Blocks of Composition
  • Week 2: Composition means putting the Elements of Design together!
  • Week 3: Photo Editing Fundamentals 1.0: "Workflow," from Exposure through Adobe™ Lightroom™??
  • Week 4: Photo Editing Fundamentals 2.0: SmartPhone Apps

Course 3 Week 2: "The Onlooker" Asymmetry Assignment

Course Four: Photography Techniques: Light, Content and Sharing
  • Week 1: The Content of a Photograph
  • Week 2: Light Fundamentals 1.0: People, Places, Things under Ambient Light
  • Week 3: Light Fundamentals 2.0: People, Places, Things under Controlled Light
  • Week 4: Finishing Pictures: Options for Showing and Sharing

Course 4, Week 1: "Portrait en Creux" Assignment

Course Five: Photography Capstone Project
  • Week 1: Defining and Launching your Capstone Project
  • Week 2: Learning from others
  • Week 3: Learning more about critically analysing
  • Week 4: Mid-Term review time!
  • Week 5: Getting ready to be ready to finish your project!
  • Week 6: Inspiration and Perspiration!
  • Week 7: Reveal the Capstone Projects!
  • Week 8: Review, Reflect, and Go Beyond!

?
Stroll Down The Promenade Capstone Project - "Sculptural Views"

Each course caters for smartphone & DSLR users so even if you don't own a proper camera, you can still take & complete the course. The only stipulation is that you complete & pass the first four courses to qualify for the final course where you put together your own project. The specialisation is done in video form, so you watch the videos, take notes {if you want} & complete a review test, which you need a certain score to pass. Most week's you also have a photography assignment to complete, based on what you have learnt that week. There are given deadlines to keep you on track but you are given 2 months to complete each course. One advantage to this course is that everything is online & you have access to all four of the weeks of the course you're on, so you can, if you want or need to, get ahead.

The only thing you have to be aware of when getting really far ahead, is that the assignment grades are done on a peer review basis. This means that the people taking the course with you {from anywhere in the world} have to review your photograph & accompanying statement. Depending on how your peers score your work, depends on your grade for the week & you need a certain percentage to pass each assignment. You are required to do the same for your fellow learners & have a number of reviews you must complete. You're given a certain number to do but you can do more if you want & have the time too. So if you're ahead, then you may have to wait longer for your grades & there might not be as many assignments for you to review either.
??
There's a number of lessons about how to critique photographs, these not only help you when reviewing other people's work but I found it makes me look at photographs in general in a different way, picking up on the detail in a shot & not just the photo as a whole. It also helps you to look at your own shots in a similar way.

?
Stroll Down The Promenade Capstone Project: "99 Lakeland Hills"

So from February through July, I worked my way through & completed the first four courses! To say I was proud of myself was huge understatement! This meant I'd qualified for the final course, the Capstone Photography Project, which is focused on a personal project & how to put a project together successfully. My hometown was my chosen subject & I enjoyed the entire process of working on it; from the planning, to taking the shots & writing up the "Gallery Statement". It was such a great experience & one that will help me as I begin to start other projects.

For those of us that completed the entire course, my fabulous Professors put together an exhibition consisting of one photograph from each learners project. The exhibition was held at the Kresge Art Centre at Michigan State University from the 21st November to the 9th December 2016. The exhibition will also be shown at the Coursera Convention that my Professors will be attending in March. They're also hoping that the exhibition will then be able to be sent & put on display any where in the world. It's absolutely mind blowing to think that one of my photographs could be travelling the world & put on display for all to see!

Stroll Down The Promenade Capstone Project - "Sea Through The Frame"
This photograph was on display at the Kresge Art Centre, MSU 21/11 - 09/12
So overall, I really do recommend this course to anyone interested in Photography. It was such a great experience & has greatly benefited my photography. I'm much more confident with my camera now. I was one of those "stay in Auto" mode photographers but this course has given me the push to play around with my settings more & be more creative when taking photos. It's also made me realise that I'd like to try & make a living from photography in the future.

If you'd like to have a look at my Capstone Photography Project, "Stroll Down The Promenade" in full, then you can find on my portfolio here: Stroll Down The Promenade Project
Please feel free to have a nosey at the other Galleries I have set up on there; some need tweaking & updating but let me know what you think. There may also be prints for sale of some them in the future.

Happy Snapping!

Louise

Bird Photography

In my last post, I mentioned photographing wildlife in your back Garden & included Birds within that. However, since Birds are the main type of wildlife that I photograph (though my cats can be pretty wild at times!) & are a great starting subject if Wildlife photography is something you want to pursue further, I thought I'd write a little separate post on Bird photography. Although, I'm definitely not an expert, I thought I'd share a few little tips that help you get started...
 
So first things first, you need to have Birds visiting your garden!
 
Tip One: Feed them, if you're not already. This will encourage them into your garden, giving you more opportunities to photograph them. Bird feeders with seeds or fat balls in them seem to go down well for most Birds. Also meal worms & apples cut in half on the ground will encourage ground feeding birds, like Blackbirds to come to your garden.
?
ISO: 200 Aperture: f/5.6 Shutter Speed: 1/500s Focal Length: 300mm
?
 
Tip Two: Be Patient & Don't Give Up! Getting a good shot can be difficult, especially with small garden birds as they move incredibly fast! This type of photography will give you the chance to play with your shutter speed settings helping you learn how to freeze motion or capture a creative blur to show how speedy these birds can be! So keep at it, your efforts will be rewarded.
 
?
ISO: 200 Aperture: f/5.6 Shutter Speed: 1/2000s Focal Length: 220mm
?
?

ISO: 220 Aperture: f/5.6 Shutter Speed: 1/500s Focal Length: 300mm
?
 
Tip Three: Set Your Camera Up First! (This one can be applied to every time to head out with your camera) It can be so frustrating when you see your shot, sort your camera settings out, go to take a shot, only to see the bird fly off before you've hit the shutter! To help avoid this, before you even think about your first shot, sort your settings out. Adjust your ISO & white balance, you can also set a corresponding Aperture & Shutter Speed but these two will change once you begin to take photographs, especially if you're after a freeze motion type of capture. I usually shoot using Program mode in the garden, which means I can set the ISO & then my camera adjusts the Aperture & Shutter Speed itself. This just means I can concentrate a bit more on the composition & creating the shot I want instead of bothering with settings.
 
Tip Four: Always Have Your Camera With You. As most amateurs or Pros, we photographers will usually grab our camera as we head out the door just in case we see something that inspires us & we want to capture the moment. Yet, when we decide to simply go & sit in the garden, often the camera is left in the house. I'm speaking from experience & had a number of occasions of running back into the house to get my camera & by the time I've come back, whatever I wanted to capture has gone. So get into the habit of having your camera with you even if your staying around your home & in your garden. You never know when a Bird might arrive in the garden while you're there & without your camera, it'll be a disappointing missed shot because you can guarantee the moment you try to move to get your camera, the Bird will have flown off!
 
?
ISO: 500 Aperture: f/5.6 Shutter Speed: 1/500s Focal Length: 300mm
?
 
I think that's all the "wisdom" I can offer when it comes to Bird Photography, I did say I wasn't an expert! I'm sure there's many more of you that know much more about this than me, so feel free to share any tips you may have regarding Bird Photography.
 
So if you've never tried photographing Birds, why not give it a try.
 
Happy Snapping!
 
Louise

Back Garden Photography

I was on Instagram, scrolling through my feed, seeing all these amazing shots of far off places, wishing I could be there. Then every now & then, I'd come across a shot of a flower or a bird in someone's back garden & those shots are as powerful & amazing as all the others!

This started me thinking: Most of the photographs I've taken have been in my back garden & of the birds that come to visit.

Now I'm sure as amateur or pro photographers, we all want to travel to exotic or spectacular locations because a great location to shoot in should usually inspire us & help us to capture some great shots. I know I do! However, some of the most inspiring places to shoot can often be our own back garden or local area & by utilising the resources & locations on your very doorstep, you can hone your creativity & skill as a photographer.  So when you do find yourself in that far off place, you'll be more likely to get that amazing shot because you've already been practising & honing your craft before you get there.

There are plenty of different types of photography that you can practise within your back garden & I thought I'd list a few to hopefully inspire anyone out there that might be struggling to find something to shoot or not sure where to start if they're wanting to try a type of photography:

Macro:

Garden photography lends itself nicely to practising Macro shots. If you own a Macro lens (Micro Nikkor if you use Nikon), then you can get up close & personal with the flowers, trees & insects in your garden. If you don't have a Macro lens, you can either have a play with seeing how close you can get your camera to focus on your chosen subject, or I remember reading an article that said to turn your lens round & shoot through the back (the part that sits in your camera) as this apparently will do the same thing as a Macro lens (I haven't tried it though). I'm sure you can also get a mount that will fix the lens to your camera this way round so you don't have to worry about letting any extra light onto the sensor, resulting in an over exposed shot.
 

ISO: 450 Aperture: f/3.3 Shutter Speed: 1/100s Focal Length: 60mm
Wildlife:

Depending on the area you live in, will depend on what type of wildlife you'll have the opportunity to photograph. I'm very blessed to live in a fairly quiet area that's flourishing with a few different types of birds. My garden is also a haven for a number of different insects, such as Bees. Plus, I also have a small wildlife pond in the garden, which is home to a few frogs that are happy to be photographed while they're sunbathing!

ISO:250 Aperture: f/5.6 Shutter Speed: 1/500s Focal Length: 300mm
Photographing Wildlife isn't without its challenges & I've found that it has really helped me to learn patience & also become a little quicker at picking up my camera. It's also helped me quicken my lens changes too, since you can guarantee a bird will arrive either on the fence, a rooftop or even join me in the garden when I've just put my kit lens back on my camera & I have to change back to telephoto lens! Of course, you don't have to use a telephoto lens but I find it helps get some nice close up shots without trying to get too close & resulting in the bird flying away before I've taken my shot.

ISO: 1100 Aperture: f/5.3 Shutter Speed: 1/400s Focal Length: 240mm
Flower, Plant & Tree Photography:

This is probably the most obvious as everyone, no matter how small or large their garden, is likely to have plant life of some description in their garden or in their home if they don't have a garden. As mentioned above, these are a good way to practise Macro Photography, but they're also a great subject to help you become more familiar with your camera settings & becoming more creative with your shots. They are a nice still subject (unless its windy, then if you don't want blur, you may need to change your focus mode to Continuous-servo) so you could maybe have a go at creative blur by slowing down your shutter speed & moving your camera. Another thing I love to do is to playing with the Exposure Value, to either darker or brighten a shot. I especially love to do this when shooting in Monochrome. Try lowering the exposure value by a stop or two & see how your shots look.

 
ISO: 200 Aperture: f/9 Shutter Speed: 1/320s Focal Length: 55mm Exposure Value: -2

ISO: 200 Aperture: f/5.6 Shutter Speed: 1/40s Focal Length: 300mm Exposure Value: -1.7


Well, that's just a few types of Photography that you can begin practising right in your very own back garden! Utilising the subjects in my back garden has done wonders for my photography & allowed me to keep taking photographs even on days when I can't get out anywhere else. So all that's left is for you to get out in your back garden & see what amazing shots you can make!

If you'd like to check out more my garden photography, then feel free to have a browse & follow my Instagram Account: @l.e.sphotography

Happy Snapping!
Louise

Welcome!

My name is Louise Shepherd, I'm an Amateur Photographer & I'm based in the tiny Village/Town of Heysham, located in the North West Region of Lancashire in the United Kingdom.

I've decided to create this little space to explore my love of photography more as
I've always been fascinated by cameras & photographs. As a small child, I have memories of being surrounded by my parents photograph albums & spending hours looking through them. Amongst the many family photo's is a photograph of myself, camera in hand so I guess being behind the camera taking photographs is something I've done from an early age.

For a long time it's been one of my causal hobbies but I am now beginning to take it a bit more seriously. I've recently completed my first Photography Course through Michigan State University via the Coursera Website which has really helped increase my photography knowledge & also boosted my overall confidence when taking photographs.

I love the whole process from capturing a moment to then spending time editing & playing with the colour on my laptop to enhance the photograph, but only if it's needed of course. Sometimes the best pictures are the ones in their natural unedited state.

I usually keep my main camera, a Nikon D3200, to hand as I never know when I might want to capture my surroundings or a moment in time. I currently have four lenses that I swap between, a 18-50mm, 55-300mm, a Micro 60mm & a 35mm Prime. To find out what else is in my kit bag, feel free to have a nosy at the Camera Kit page on here.

If you'd like to have a look some of the photographs I've taken over the past few years, then please feel free to head over to my Crevado portfolio: L.E.S Photography Portfolio Included there is my first Photography Project "Stroll Down the Promenade."

My hopes with this little place is to document a few of the "adventures" I get up to with my camera whether that's when I go & about, when I'm around the house or in my garden. I'm also going to try & document the process of working towards starting my own photography business.

If you have any questions or suggestions, please feel free to leave them in the comments below & I'll be happy to reply.

Happy Snapping,

Louise