5
Mar, 2018
Photowall - Review *Sponsored Content*
This blog post is brought to you today in association with Photowall. I was contacted by them & asked if I'd be interested in working with them on a blog post. After checking out their website & the products they offer, I agreed & as a thank you, they have kindly given me a 20% discount code for all of you, my lovely readers!
2} Now you choose your product type by either clicking on "Wall Murals" or "Canvas Prints" & then selecting either "Categories" or "Custom" - I chose "Canvas Print" & then "Custom"
5} On the "Your Cart" page, under the details of your order & the price, you'll find a clickable link that allows you to add a discount or gift card code. Here's where you can enter the 20% discount code I've been given for you all:
6} The next page is "Confirm your order" This is where you need to add in your billing address, name, phone number & email.
7} As my canvas is free I was taken straight to the final order confirmation page. But all you'll need to do is add in your payment details & then complete your order.

I placed my order very late on a Friday night, received my confirmation email & then received my dispatch email on the Monday. My canvas arrived on the Thursday, which I was really surprised at due to the incredibly bad weather that's going on in mainland Europe & the UK right now! So from ordering to delivery took 4 working days & the canvas arrived well packaged in a sturdy box, so it's very protected in transit.
As the canvas doesn't come with the frame already fitted, you'll need to do a little bit of "D.I.Y" & fit the frame to the canvas. There are instructions included on how to do this, along with all the brackets & screws you'll need. Photowall also have a handy tutorial video on Youtube to help with this.
You can watch the video here or simply search Photowall on Youtube.
Now let me just say for the record that I'm not the biggest fan of canvases for wall art as you can often see the texture of the canvas material through the image that's been printed on them & I find that distracted from the image itself. Photowall's canvas is completely different! It's incredibly high quality & as it's 100% cotton, it feels lovely. The print is stunning, my photograph hasn't lost any of the detail I captured & you can barely see the texture of the canvas as it's so smooth! The only tiny little issue was a couple of loose threads from where the canvas had been cut to size but these were easily sorted by cutting them off.

As for putting the frame together, my Dad actually did this as I'm an even less D.I.Y person than he is! As he said; "If I can do it, anyone can!" It's that straight forward! Having the Youtube video in addition to the instructions was very helpful, especially as my Dad said he prefers to watch tutorial videos rather than use written instructions.
From helping my Dad fix the frame to the canvas, I recommend taking your time as it's important to make sure that each part of the frame is straight & flush to the edge of the canvas as once stuck down, it would be very hard to take off again. Not rushing, it took less than 30 minutes.
The main tip from my Dad; Peel the tape from the frame pieces carefully! Part of the glue from the tape came away on one of the edges, which wasn't a major issue as the part of the canvas it effected was one of the corner pieces that fits between two sides of the frame so once the frame was completed, you couldn't tell.
It's nice & sturdy so it can stand up without falling yet it's lightweight, which means you're not having to struggle with it being heavy while you're hanging it on the wall with the provided bracket. Okay sure having to fit the frame onto the canvas can seem like a bit of a faff but it went together well & with no issues other than the tape not peeling quite right on the first piece - but that's more of a tape issue that an issue with the frame.
One of the aims of any photographer {well for me anyway} when they are looking to display their work is to find a product that will really show off the image they have captured & to find a company that takes as much care in printing & producing that product as the photographer has put into the making of said image. I feel I've found that with Photowall. Honestly, I'm such a big critic of my work & when I see my images printed or framed, I find myself scrutinising it, looking for ways I might make it better. But the quality of the print job on this canvas makes my photograph look incredible & as such I found it hard to pick up on anything I didn't like.
Overall, my impressions of Photowall & their canvas are excellent & I'm not just saying that because they're sponsoring this post & have sent me a canvas to review. I can honestly say that Photowall make top quality canvases & I think they may have converted me into a canvas lover! So I really do recommend them if you're thinking of getting a new piece of wall art or you're redecorating & after some unique wallpaper. Plus if you do buy from them you'll have the nice bonus of 20% off if you use my discount code: LoPhotoCampaign2018 {valid for 30 days; 5th March - 5th April}
Please let me know if you do use the code & order a canvas or wall mural from Photowall, I'd love to know what you think of them. Also if you have any queries or questions regarding the order process or want more details on the canvas or photograph, please feel free to either leave me a comment on this post, tweet me or email me.
I hope you are all as well as can be & keeping warm in this incredibly cold weather.
Take care,
Louise
You're probably wondering who Photowall are & what they do? Well let me tell you...
Photowall are a Swedish company with a passion for design & quality. They offer a choice of wall murals / wallpapers {a great option if you're wanting to add a personal touch when you're decorating your living or work space!} & Canvas Prints. All are environmentally friendly, fire-retardant & won't fade in the sunlight, which is a great as there's nothing more annoying than sun bleached wallpaper or wall art! The printing ink they use contains no solvents or hazardous chemicals, & is biodegradable.
They can create unique, inspiring wall décor & work with talented photographers & designers from around the world. They also offer you the opportunity to use your own photographs to make your wallpaper or canvas print even more personal. Photowall also work with licensed brands & are an official partner for Disney, Modesty Blaise, Moomin Characters & others. So they're the place to go if you want to have for your favourite film star on your wall!
They use cutting-edge digital printing techniques to guarantee quality & precision on all their products. Customer service is also a priority & they aim to give their customers the best service they can!
Photowall also work with an organisation called Vi Agroforestry who are an Swedish aid organisation. Every year they plant 5,000 trees in the area around Lake Victoria in Eastern Africa. The trees help to fight poverty, improve the environment & combat climate change. So by shopping with Photowall, you are supporting Vi Agroforestry & doing your bit for the planet, which is pretty awesome!
So now you know a little bit more about them, I'm going to walk you through placing an order with them. Photowall kindly offered me a free canvas of one of my own photographs for working with them, so I'm able to give you a full honest review from start to finish; how the order process works & what the quality of the finished product is like.
Let's get started:
1} First thing you need to do is head to Photowall.com & then select either the flag of your country or the little globe for "Rest of the World" if your flag isn't listed.
 |
| Photowall Homepage |
2} Now you choose your product type by either clicking on "Wall Murals" or "Canvas Prints" & then selecting either "Categories" or "Custom" - I chose "Canvas Print" & then "Custom"
- "Categories" will show you all the photographs you can choose from, split into different themes including "Animals", "Landscapes" & "Film, TV & Cartoon"
- "Custom" takes you to a page where you can upload your own image - which is the option I chose.
- You also have the option of choosing either "Designers" "Rooms" or "Colours" which allows you to search & view images via these options.
3} If you chose to use your own image, now is the time to choose the photograph you want to use & upload it. You do this by simply clicking "Select You Image" & then "Upload"
- When doing this, remember the bigger the pixel count, the better the quality. A good guideline is that the image must have at least 1 pixel for every millimetre of the wall mural or canvas.
- If you go to the "Price Calculation" tab in the box on this page, you can play with the product size you want & see how much this will cost.
4} Next you will work your way through the following 5 Steps:
- "How do you want to order" - Choose "Order direct" if you don't have any special requests for your image. If you need some more help like colour correction, adding or removing an object, changing proportions or anything else you want doing to your image, choose "Personal assistance please" You then leave your contact details with what you want doing & someone will get back to you, usually within 1-2 business working days. ***Please note there is a charge of £36 per hour for this service but only if they do any editing, queries are free to send.***
- "Framing" - either choose "With a do-it-yourself frame" or "Canvas only" The canvas doesn't come fully assembled, as there is a risk of it being damaged in transit. So if you want your canvas to hang on the wall, it suggests including a 29mm frame that you then fit to your canvas print. I chose to have the frame.
- "Edge" - this gives you the option of either having your canvas image wrapped {your image continues around the sides of the canvas} or alternatively you can have either a black or white edge. I chose image wrapped.
- "Your dimensions" - This is where you choose the size of your canvas. You can change the measurement to inches if you don't like working in centimetres. What's nice is that, as you play around with the sizing, you can see it applied to your picture & where it would be cropped & where the edging would be. This helps you choose the best size to show off your image. Mine looked best at 100cm x 50cm & I only lost a bit of the sky.
- "Crop as required" - This brings up your image full screen so you can get a closer look at where the image would be cropped, based on the size you have chosen. You can then move the marked out red box to choose how you want the final image to be cropped ready to be printed onto the canvas.
Once you've double checked that all the options you have chosen are correct, just click "Add to Cart" & you're almost done!
 |
| Adjusting the canvas size. |
5} On the "Your Cart" page, under the details of your order & the price, you'll find a clickable link that allows you to add a discount or gift card code. Here's where you can enter the 20% discount code I've been given for you all:
- My 20% discount code is: LoPhotoCampaign2018 {The code is only available for 30 days, so you need to place your order by the 5th of April}
- Make sure "Private Customer" is selected {unless you're a Business of course, then choose "Business Customer" or "Contract Customer"}
- You can also tick or untick the box to decide if you want to receive emails from Photowall telling you about any offers & the like.
Once that's done, simply click on "Proceed to checkout".
6} The next page is "Confirm your order" This is where you need to add in your billing address, name, phone number & email.
- If your delivery address is different to your billing one, just select "Other delivery address" & add in the address you want your product sending.
Once you've doubled check your details, click "Proceed to payment"
7} As my canvas is free I was taken straight to the final order confirmation page. But all you'll need to do is add in your payment details & then complete your order.
- You can pay either with Visa, MasterCard or Paypal.
8} That's it! You'll receive an email confirming your order & then another one once your order has been dispatched to you.
- European orders are free & will take between 3 - 6 business days. The orders are delivered by DB Schenker
- The Rest of the World takes 2 - 6 business days & there is a charge ranging from €19 - €49. These orders are delivered by DHL Express.

I placed my order very late on a Friday night, received my confirmation email & then received my dispatch email on the Monday. My canvas arrived on the Thursday, which I was really surprised at due to the incredibly bad weather that's going on in mainland Europe & the UK right now! So from ordering to delivery took 4 working days & the canvas arrived well packaged in a sturdy box, so it's very protected in transit.
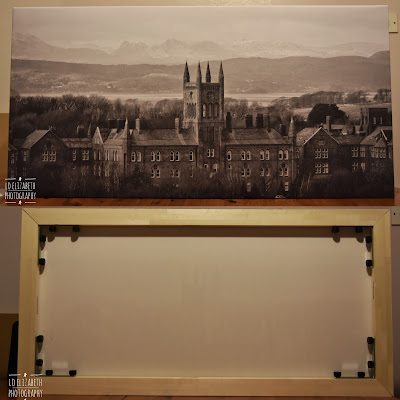
As the canvas doesn't come with the frame already fitted, you'll need to do a little bit of "D.I.Y" & fit the frame to the canvas. There are instructions included on how to do this, along with all the brackets & screws you'll need. Photowall also have a handy tutorial video on Youtube to help with this.
You can watch the video here or simply search Photowall on Youtube.
Now let me just say for the record that I'm not the biggest fan of canvases for wall art as you can often see the texture of the canvas material through the image that's been printed on them & I find that distracted from the image itself. Photowall's canvas is completely different! It's incredibly high quality & as it's 100% cotton, it feels lovely. The print is stunning, my photograph hasn't lost any of the detail I captured & you can barely see the texture of the canvas as it's so smooth! The only tiny little issue was a couple of loose threads from where the canvas had been cut to size but these were easily sorted by cutting them off.

As for putting the frame together, my Dad actually did this as I'm an even less D.I.Y person than he is! As he said; "If I can do it, anyone can!" It's that straight forward! Having the Youtube video in addition to the instructions was very helpful, especially as my Dad said he prefers to watch tutorial videos rather than use written instructions.
From helping my Dad fix the frame to the canvas, I recommend taking your time as it's important to make sure that each part of the frame is straight & flush to the edge of the canvas as once stuck down, it would be very hard to take off again. Not rushing, it took less than 30 minutes.
The main tip from my Dad; Peel the tape from the frame pieces carefully! Part of the glue from the tape came away on one of the edges, which wasn't a major issue as the part of the canvas it effected was one of the corner pieces that fits between two sides of the frame so once the frame was completed, you couldn't tell.
It's nice & sturdy so it can stand up without falling yet it's lightweight, which means you're not having to struggle with it being heavy while you're hanging it on the wall with the provided bracket. Okay sure having to fit the frame onto the canvas can seem like a bit of a faff but it went together well & with no issues other than the tape not peeling quite right on the first piece - but that's more of a tape issue that an issue with the frame.

One of the aims of any photographer {well for me anyway} when they are looking to display their work is to find a product that will really show off the image they have captured & to find a company that takes as much care in printing & producing that product as the photographer has put into the making of said image. I feel I've found that with Photowall. Honestly, I'm such a big critic of my work & when I see my images printed or framed, I find myself scrutinising it, looking for ways I might make it better. But the quality of the print job on this canvas makes my photograph look incredible & as such I found it hard to pick up on anything I didn't like.
Overall, my impressions of Photowall & their canvas are excellent & I'm not just saying that because they're sponsoring this post & have sent me a canvas to review. I can honestly say that Photowall make top quality canvases & I think they may have converted me into a canvas lover! So I really do recommend them if you're thinking of getting a new piece of wall art or you're redecorating & after some unique wallpaper. Plus if you do buy from them you'll have the nice bonus of 20% off if you use my discount code: LoPhotoCampaign2018 {valid for 30 days; 5th March - 5th April}
Please let me know if you do use the code & order a canvas or wall mural from Photowall, I'd love to know what you think of them. Also if you have any queries or questions regarding the order process or want more details on the canvas or photograph, please feel free to either leave me a comment on this post, tweet me or email me.
 |
| All done & on the wall! |
I hope you are all as well as can be & keeping warm in this incredibly cold weather.
Take care,
Louise